


How Can We Help?
Expense Module – Admin Guide
WEB PAGE – WHERE TO FIND IT
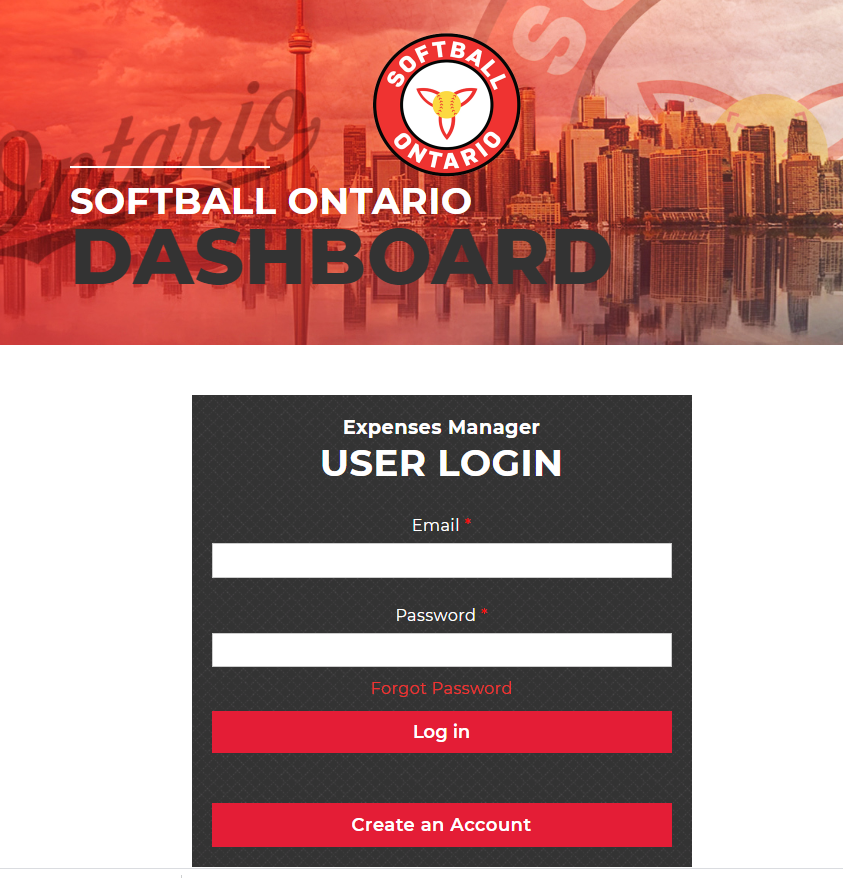
ALL USERS – https://expenses.slopitch.org
Create New Profile:
First time users of the Softball Ontario Expenses module will need to create a profile to be able to submit expense reports.
To create a new profile, click on the “Create an Account” button at the bottom of the login Screen.
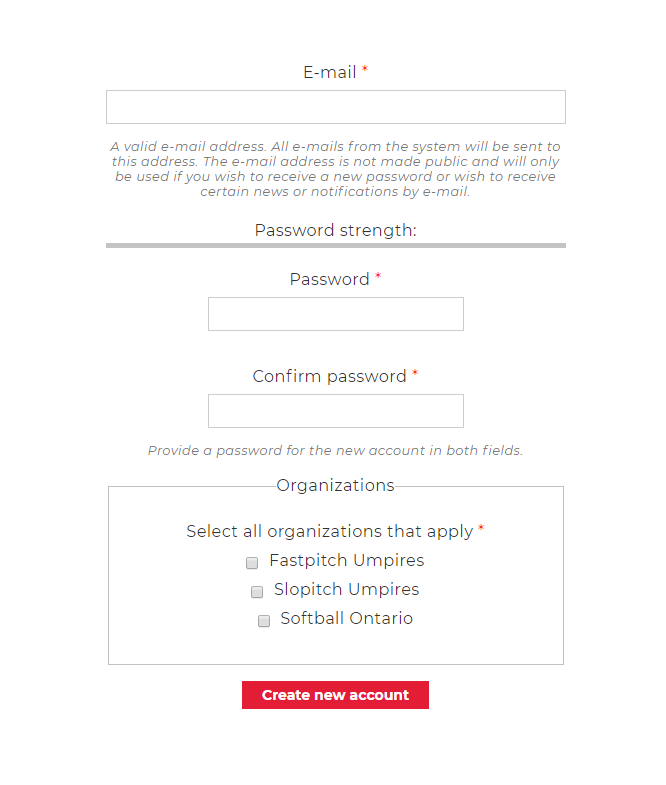
Enter in your preferred email address and password.
REMEMBER to select any of the organizations you could potentially have to submit an expense report for.
Click on the “Create new account” button to finish the process. You will then be forwarded to your dashboard where you can start to submit an expense claim.
Logging in:
Enter in the Username (e-mail) and password that you signed up with. If you have forgotten your password, you can recover it by clicking on the “Forgot Password” link.
Note: All users will be logged out after 30 minutes of inactivity. Users can also log out by clicking the “Logout” button on the bottom-left corner of each page.
Submitting an expense claim:
All users will have a button labeled Submit New Expense Claim
for every association they belong to / signed up with. Click the appropriate
button for the Expense Claim Form page.
Note: Not every user will see all available fields as each category is controlled
by the association administrator.
Personal Details
Enter in your name, the e-mail field for the expense form will autofill with the e-mail associated with your user account. This can be changed here if needed
Event Details
Event details will vary based on what was set up by the group administrator. Select your event type, the date and location. If the event type is missing from the list, you can manually enter it in under the “Specify if ‘Other’ or ‘Meeting’” text box.
Travel
If travelling by automobile, enter the number of km travelled for the event and if any individuals came with you. The amount field will automatically calculate based on the association mileage allowance. If there was additional travel by Train, Airplane or Taxi, enter the expense into the area provided.
Accommodations
Enter in the name of the Hotel and the amount of the expense.
Meal Allowance
Meal allowance values are determined by the administrator, in this area just enter in the number of meals that fell into each category. The Meal Allowance Total will automatically calculate.
Telephone
Enter in the amount claimed.
Instructor / Evaluator
Enter in the amount claimed.
Other Expense
If an expense is not covered by any of the above categories it can be entered here. Enter in the description of the expanse and the amount claimed.
Total Expenses
Each amount field takes a numeric value and will automatically calculate it into the expense form “Total” field (this field cannot be edited)
Print Expense Form
Users can print their expense claim before submitting by clicking “Click to print a copy before you submit your claim” above the “Submit Expense Form” button.
Submit Expense Form
To submit your expense report, click the but red “Submit Expense Form” at the bottom of the page. Upon submitting the expense claim, both the user and associated Expense Approvers will receive an email notification that an expense claim has been submitted
An email will also be sent to the Submitter once an expense claim has been approved, or rejected.
Note: Any fields labeled with a red star (*) are mandatory
EXPENSE APPROVER
Dashboard:
Log in to the expense Portal and click the Review Submitted Expense Claims button (one will appear for every association that the Expense Approver belongs to)
Search
You can search for expense claims by selecting the mandatory fields: Status, Event Type, and Year. Note: A claimant name is not mandatory for the search.
Click the List Expense Claims button. If there are no claims matching the Expense Approver’s search, a “no records found” message will appear.
Search Results
Expenses will be displayed based on the search criteria. If needed, approvers can remove bad or duplicate claims directly from this page by clicking the delete option.
Edit Claims
An approver can edit and/or change the status of an expense claim by clicking on Details beside the submitted expense on the search results page. All fields on a claim that has been submitted can be edited except claims that have been already been set to Paid status.
Approve Claim
In order to send a claim to the cheque manager to issue a cheque, set the expense Claim Status to “Approved” (located at the end of the form) and click the “Update” button
Printing
Expense Approvers can print the expense claim before updating the approval status by clicking the Click to print a copy option above the “Update” button.
Notifications
Both the expense submitter and the Cheque Manager will receive an e-mail notification if a claim has been set to the approved status.
CHEQUE MANAGER
Dashboard
Log in to the expense Portal and click the Manage Cheques button (one will appear for every association that the Cheque Manager belongs to). Only approved claims will appear on the Manage Cheques page.
Enter in Cheque Information
On an approved claim, enter in the associated cheque number in the text field located in the Cheque Number column and click the Update Cheque Numbers button.
Status Change
The approved Expenses will be set to a Paid status and will no longer appear on the Manage Cheques page.
Notifications
The Expense submitter will receive an e-mail notification that their cheque has been written and should be on the way shortly.
EXPENSE ADMINISTRATORS:
Dashboard
Expense Administrators have access to all functions: submitting expense claims, managing submitted expense claims, managing cheques as well as configuring expense costs and configuring event types.
Workflow
Whether submitting or managing expense claims as an Expense Administrator is the same process as the Expense Approver, the workflow doesn’t change. In addition, managing cheques also uses the same workflow as the cheque manager.
Configure Expenses
To configure the dollar amount used to calculate totals on the expense form for items such as; cost of driving per KM, breakfast, lunch, and dinner, click on the configure expense costs button on the dashboard for the respective Association. Enter a dollar amount and then click the submit configuration values to save those values.
Event Types
To Manage the event types that show in the event details section of the expense form, click the configure events link on the dashboard for the respective Association. Events can be added /Removed and edited from this page. To add a new event type click on the add term link and enter the event type in the name field and click save when completed.